Forum Replies Created
-
giovannicold
- in reply to: Display a checkbox value within a repeatable field
- August 16, 2014 at 4:09 pm
Jason, when you are retrieving a value from a checkbox, it’s returned an array of value, since the check box can have multiple choices.
Following your code above, since checkbox can have multiples values, sometimes when the user select 2 checkboxes your code will not work.
I recommend you to use the option Radio Button, then the user can select only one option only. If you still want to continue with the checkbox, you can do it by this way:
<?php if( have_rows('checkbox_repeater') ): ?>

	<?php while ( have_rows('checkbox_repeater') ) : the_row(); ?>

		<?php
			$color = get_sub_field('checkbox');
			$background = get_sub_field('background');
			$content = get_sub_field('content');
			echo "color = "; var_dump($color); // just for debugging
		 ?>
		<br />
		<br />
		<section style="background-color:<? echo $background[0]; ?>; color: <?php echo $color[0]; ?>; height:40px; width:100%;">
			<?php echo $content; ?>
		</section><br /><br /><br />

	<?php endwhile; ?>
<?php endif; ?>
The result of this code is on the file annexed.
If you want to know more about the checkbox field, you can check the docs.
Here is the link:
[CHECKBOX] http://www.advancedcustomfields.com/resources/checkbox/To display the radio button, you don’t need to specify the array number, because for radio buttons it’s returned a normal string.
$radio_field = get_sub_field('radio');
echo $radio_field; // returned: #CCCCCC
var_dump($radio_field); // debug, returned: string(4) "#ccc"
Have a nice day! =D
 checkbox.png.png
-
You can get the value of the field and set to a variable then verify the options. Here is the code:
<?php

$option =  $the_field('myfield');

if($option == "1"){ $color = "red";}
elseif($option == "2"){ $color = "blue"; }
elseif($option == "3"){$color = "green"; }

?>

<div style="background-color: <?php echo $color; ?>; ">My Content</div>
Of course there is other ways to do it, like an array with the options and the colors etc.. but the ideia is the same.
Hope this helps you. =D
-
ACF do not offer the option to see how many characters he/she’s got left but you can do this through jquery, create a file example.js on your theme folder and then link it to your backend, get the ID of the field and done.
http://www.scriptiny.com/2012/09/jquery-input-textarea-limiter/
-
You can stylize that with css on the backend, choose the mode block, and them create .css file on your theme, then “link” the .css to the backend, after that use the “Inspect” on safari/chrome/firefox to see the div’s and starting coding the css. In that way you can modify to look like “standard layout mode like any other field group is rendered”.
And the ideias about collapse and drag n drop features i totally agree on making this. =D
-
giovannicold
- in reply to: ACF and Widgets
- August 15, 2014 at 12:01 am
I don’t know exactly what you want but here is what i think it is:
You can assign the custom forms to widgets, unfortunately it’s only possible on ACF5.
First step is creating your widget:
class CustomWidget extends WP_Widget {
	function __construct() {
		parent::__construct(
			'custom_widget', // Base ID
			__('CustomWidget', 'text_domain'), // Name
			array( 'description' => __( 'Some CustomWidget', 'text_domain' ), )
		);
	}
}

// register Foo_Widget widget
function register_foo_widget() {
    register_widget( 'CustomWidget' );
}
add_action( 'widgets_init', 'register_foo_widget' );
After that, on the menu go Custom Fields > Custom Fields > Your Field > At the Location tab (Rules) choose on the first select “Widget” after that select “is equal to” and the name of your widget, in this case: “CustomWidget”.
After that save your field, go to theme > widget and drag and drop your widget on the area that you want.
I’m sending 2 pictures, on of the configuration field, and the other is the widget panel.
Hope this helps you! =D
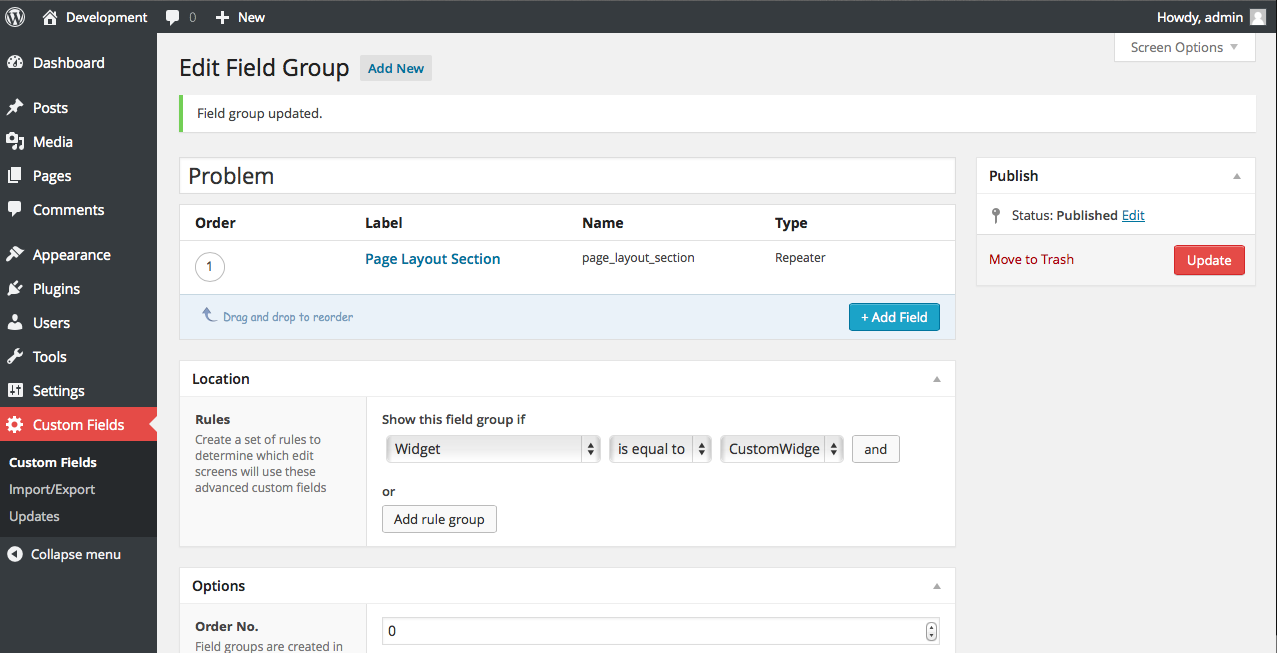 custom-field....png
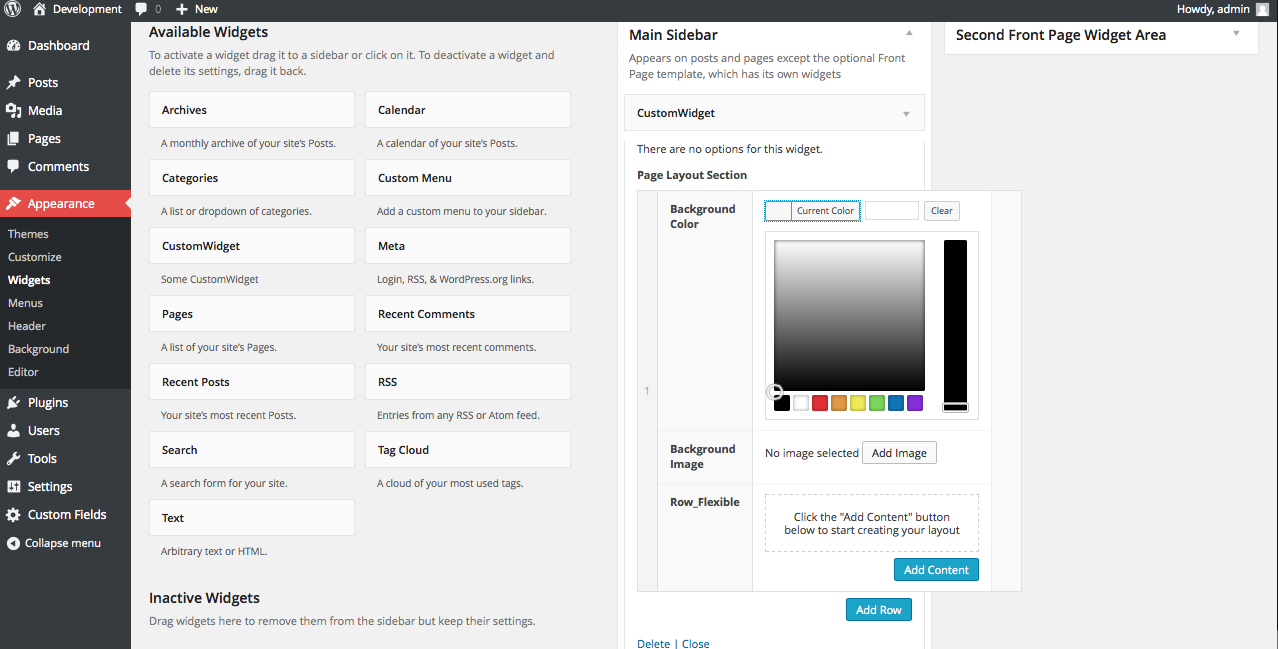 widget-panel....png
-
Ok, after the all tests we’ve done and no result was made i went to my wordpress to test your code, the result was the code worked smoothly, nothing wrong.
Here is the result picture: bit.ly/1oM2L0zSo maybe it’s the way your doing wrong, in my case i create a page and then create i file on my theme with the ID of the page, e.g. page-7.php, there i put your code.
On the configuration fields, i linked the fields to that page, nothing different and then your code i just changed the “row” to “row-flexible”.
I’m sending 2 files: the first one is the .json with my configuration fields, the second is the page-7.php.
How is the way that you are doing?
Edit: You can of course set your code on the page.php normally but you can also create a “page template” and then set it on the configuration of the page. The last option is closer to the professional way. =D
 acf-export-2....json
 page-7.php_.....zip
-
Yeah, you will lose. Do a backup of the stuff first.
-
Ok, lets check somes things, try change the name of the flexible_content, the name “row” may be getting in conflict with something.
Check if the “<?php if( get_row_layout() == ‘full_width_row’ ): ?>” have the correct name of the field, maybe its working but the “if” is blocking.
-
You can’t get the value of a field on the second repeater to the first, but you can send the value of the field on first repeater to the second. This should work, just as you did.
Link a picture of the configuration fields, on the backend.
-
Yeah, i think i found the error, you have 2 Repeaters alright, soo you are saving the variables on the first repeat, you have to put on the second repeat, below the line 22 on the pastebin. Because on the first repeat the field that you trying to get doesn’t exist, only on the second.
-
Is this happening only with this field? The others fields are returning some content?
-
When you create the field type “image” you have to choose the return value: Image URL
Why is that? Because if the default value is set to “Image Object”, that return an array of values that contains a bunch of info about the image, like: url, width, height, size etc.. but when you set to Image URL then will return the full path of your image: e.g. http://mysite.com/wp-content/uploads/2014/08/myimage.jpg.
If you want more information about the image field type, you can check through here: http://www.advancedcustomfields.com/resources/image/
=D
Welcome
Welcome to the Advanced Custom Fields community forum.
Browse through ideas, snippets of code, questions and answers between fellow ACF users
Forums
Helping Others
Helping others is a great way to earn karma, gain badges and help ACF development!
