Forum Replies Created
-

Hi @mikehermary
Do you have a link where I could see it in action, so I could look at the source HTML?
It feels like an HTML/CSS issue more than a WordPress/ACF issue but I will have a quick look.
It works for me when I duplicate it… so it might be something more specific with your setup. Perhaps activating a different theme briefly to see if it’s the theme.. then go from there?
-
You can use a filter to disable fields by name.. see an example below where I disable 2 fields… you can even disable by role/capabilities etc.
<?php
/* START: Makes the 'Customer Name' and 'Customer ID' fields in Users Read-Only */
function cc_make_customer_name_and_id_fields_in_users_read_only( $field ) {
  $field['disabled'] = 1;
  return $field;
}
add_filter('acf/load_field/name=cc_customer_name_user', 'cc_make_customer_name_and_id_fields_in_users_read_only');
add_filter('acf/load_field/name=cc_customer_id_user', 'cc_make_customer_name_and_id_fields_in_users_read_only');
/* END: Makes the 'Customer Name' and 'Customer ID' fields in Users Read-Only */
?>
More info on the filter used can be found here.
-
Keith Lock
- in reply to: ACF with postcodes
- September 6, 2017 at 7:23 am
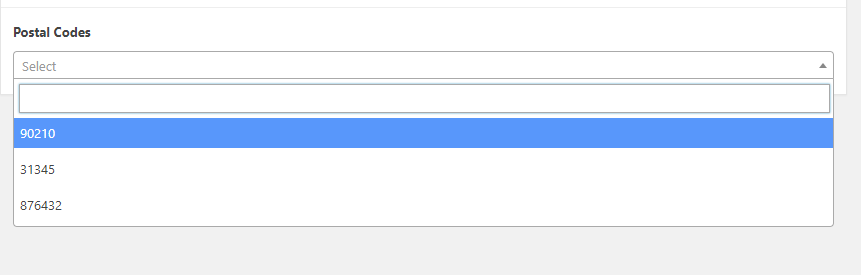
Hi @jm_design
What about using a Select field with Stylised UI turned on… and then Users can type in the box to filter the list and choose one if it exists?
 postal_codes....png
-
Keith Lock
- in reply to: Font Picker field
- September 6, 2017 at 7:18 am
Hello.
Awesome ACF has a couple different solutions for this. Some aren’t native WP plugins, but instead… code that resides on GitHub for you to include yourself.
Feature requests to include things into the core of ACF can be submitted through the ACF ticket system. It’s difficult to know if this will make priority… it’s up to the sole developer 🙂
Hope the existing solutions found on Awesome ACF can help you out!
-
Keith Lock
- in reply to: Custom fields are not displayed when corresponding custom post is created
- September 6, 2017 at 7:10 am
You can use a tool like: Admin Columns to accomplish that.
The Pro Version makes it simple to add Columns for ACF fields, but you can get away with the free one in some cases (just in a different, work-around kind of way).With that said.. you can use some native WordPress filters to do it with code, as opposed to a UI with Admin Columns.
Let me know if you need further clarification.
-
Hi @mrspabs
Below is some code cleaned up a bit. I am assuming that 2006 is your Post ID? You don’t need to pass that to sub fields of your repeater, but it doesn’t hurt.
I just added an extra bit to the ‘while’ statement making sure to only loop 3 times. I created the iteration variable just above the while statement with a value of 0. I then increment that value at the end of the while. Hope this helps! Please mark this thread as resolved if so, otherwise please reply with more questions.
<?php
date_default_timezone_set( 'America/Los_Angeles' );
$today = date( 'Ymd' );
if ( have_rows( 'events', 37 ) ) {
?>
<ul>
<?php
  $i = 0;
  while ( have_rows( 'events', 37 ) && $i<4 ) {
    the_row();
    $expire = get_sub_field( 'expire_on' );
    if ( $expire > $today ) {
?>
<li class="eventrow event<?php echo get_row_index(); ?>">
  <h3>
    <a target="_blank" href="<?php the_sub_field( 'events_link' ); ?>">
      <?php the_sub_field( 'events_title' ); ?>
    </a>
  </h3>
  <p>
    <?php the_sub_field( 'events_date' ); ?><br />
    <em><?php the_sub_field( 'events_location' ); ?></em>
  </p>
</li>
<?php
    }
    $i++;
  }
?>
</ul>
<?php
}
?>
p.s. Thanks for teaching me about the get_row_index() function!
-
It may be just about closing the p tags. Give that a try. Or wrap them in spans with br’s perhaps?
-
Hi @kanlukasz
There are situations where you can clean up some data… and others where it may be prove to be more difficult.
Here are a few threads offering possible solutions. The last thread discusses this topic/concern in great length… offers workarounds… etc. All links below are worth a peek and can potentially help you on a case by case basis. Hope you get this resolved!
Removing data from WP db after deleting a field group
Deleting field data manually from DB
-
Hi @ibdf
Here is some discussion on that topic. It doesn’t seem viable because of the Key is used “behind the scenes”.
Sorry this wasn’t a more helpful response.
-
Perhaps something like the code below (change the ID)…
Note: you can target it using a Field Key or custom CSS ID
<?php
/* START: Changes height of Gallery Field */
function my_change_gallery_field_height() {
?>
<style type="text/css">
  #acf-field_59aefd2fd922c {
    height: 210px;
  }
</style>
<?php
}
add_action('acf/input/admin_head', 'my_change_gallery_field_height');
/* END: Changes height of Gallery Field */
?>
Let me know if that does it for you, and kindly mark as resolved if so!
-
Hi there…
A potentially different way to tackle it would be to:
a) Use a Select field
b) Have an Option Page (here’s an Admin Tool to create Option Pages for ACF) with the default choices
c) Dynamically populate the select field’s choices with values from the Option Page (and sort them even)
d) Offer an ‘Other’ text box for when the choice is unavailable in the Select
e) Any time someone uses Other… add it to the default choices, add it as the value in the Select field, clear the Other field (using a ‘save’ filter)
I did this very thing for a horse race track website and it works beautifully (see attached images). The user chooses who he feels will win the races. To save him time, he chooses the horse from the drop-down (which pulls its values direct from a field in an Option Page)… but uses the “Other” text box when needed. My logic also makes sure there are no duplicates when he uses the “Other” box.
If this works for you, please mark as closed, or reach out if you need further help!
 options_page....png
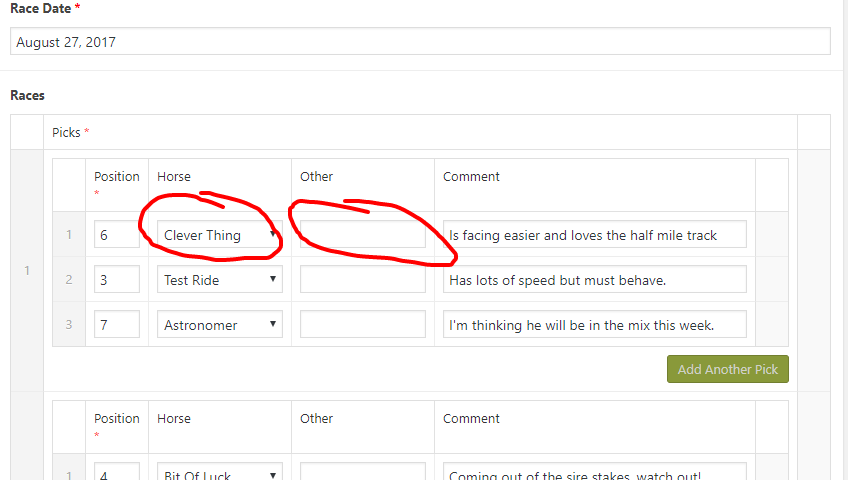 other_choice....png
-
Hi @kikadesign
Since you are outside the loop, you will have to also pass in the Post ID (using get_the_id()) when using: have_rows in the format:
while ( have_rows('book_reviews', get_the_id()) ): the_row();However, with the above code… you cannot pass in the ID until after this line:
while( $my_secondary_loop->have_posts() ): $my_secondary_loop->the_post();So… you will have to come up with different logic to check if there are any rows, and to wrap your unordered list, but I imagine this will get you on the right track.
Please mark as resolved or feel free to ask more q’s if needed.. I will subscribe to this thread.
-
Hi @csk87
I took a look in the translation file..
It seems the translator translated both “Link” and “Page Link” to “Sidlänk”
You could see/correct this on line 1963 of: /wp-content/plugins/advanced-custom-fields-pro/lang/acf-sv_SE.po
However, your changes could be overwritten later.
Here is some info on making the translations official.
Hope this helps! Please mark as resolved if so, otherwise let me know if I can dig in further and I will be happy to help.
-
Hi @leanda
Interesting case study for WordPress/ACF.
What you described can definitely be done.
You can create a Custom Post Type perhaps (or just add Custom Fields to the standard Post), and… during the “Save” process, you can intervene using the acf/save_post filter to do your calculations.
If you would rather the Users not have to login, you can use front end forms as you mentioned. The guide to create Front End Forms with ACF is here.
In addition, all the filtering desires you mentioned (top 3 scores, by-the-week, etc) can be accomplished with custom queries. See this doc here.
If this is helpful, please mark as resolved, and then revisit if you run into anything each step of the way. Perhaps we could have separate threads for each topic as we help you out. Best of luck with your project! Props to giving us older folks a bonus 4k 😉
Keith
-
I can’t be sure what the issue is, but I wanted to let you know that I have a clean install of WordPress Version 4.8.1 with ACF Pro Version 5.6.1 and everything worked OK for me.
Check out the screenshots below:
It might be another plugin affecting the output perhaps?
Have you tried the default WP theme, or perhaps deactivating plugins?
Let me know if I can help further, I am subscribed to this thread so I will get email alerts with your replies.
-
Hello @m-civita
Rather than create a new custom title, and attempt to associate it with the WP Title in some way, would you rather just move the WP Title to a different spot amongst your ACF fields? Otherwise the rabbit hole can get very deep. For example, you might then need to alter how your lists of Posts are displayed in the Admin, etc.
I have ran into scenarios where the Post Title would be handy to use still, but being at the top of the page, it wasn’t within the proper flow for data entry. If that’s the case for you as well, below are the steps to go about moving the WP Title to a different location.
This link has an example of how to move the Content Editor, and the process is very similar for that of the Title.
STEP 1: The first step is to create a Placeholder Field for the Title. Use the Message field type with default settings for that.
See the screenshot below for an example in practice. I moved the WP Title, and used it as “Job Name” within a “Projects” Custom Post Type.
STEP 2: The next thing you will need to do is locate the “Field Key” for the Message Placeholder Field from Step 1. The simplest way to do that is:
a) Go to the ‘Edit Field Group’ screen where that field is located.
b) Click ‘Screen Options’ at the top of the page, and put a check next to ‘Field Keys’ if it isn’t already checked. You will then see a new ‘Key’ column in your list of fields.
c) Copy the Field Key, but only the portion after field_ (see the screenshot below)
STEP 3: Now, you will need to include some custom code. I generally create custom plugins for this. A very simple way to create a custom plugin is by using the free plugin Pluginception.
Below is sample code to move the Title.
You will need to replace XXXXXXXXXXXXX with the value you copied from Step 2c above.
In addition, the following line may not be necessary in your situation. I wanted to make the title a required field, so I included it. If you choose to keep the line, additional code will be required, which I will display below.
$('.acf-field-XXXXXXXXXXXXX .acf-label > label').append(' <span class="acf-required">*</span>');Also, the second style ( namely: .acf-field-XXXXXXXXXXXXX #titlediv #title ) that I added in the code below is optional. I included it because the WP Title text box by default has different styles than the ACF text boxes.
Include this code within your custom plugin or functions file:
<?php
/* START: Moves the WP Title text box to a more appropriate place when adding/editing Projects */
function cc_move_wp_title_for_projects() {
?>
<script type="text/javascript">
  (function($) {
    $(document).ready(function(){
      $('.acf-field-XXXXXXXXXXXXX .acf-input').append( $('#titlediv') );
      $('.acf-field-XXXXXXXXXXXXX .acf-label > label').append(' <span class="acf-required">*</span>');
    });
  })(jQuery);
</script>
<style type="text/css">
  .acf-field #wp-content-editor-tools {
    background: transparent;
    padding-top: 0;
  }
  .acf-field-XXXXXXXXXXXXX #titlediv #title {
    height: 28px!important;
    font-size: 14px!important;
    line-height: 1.4!important;
    padding: 3px 5px!important;
    margin: 0!important;
  }
</style>
<?php
}
add_action('acf/input/admin_head', 'cc_move_wp_title_for_projects');
/* END: Moves the WP Title text box to a more appropriate place when adding/editing Projects */
?>
Optional STEP 4: Now, if you decided to keep the line in the code above to make the title a “required” field, below is some more code to use within your custom plugin or functions file.
Initially, you will want to alter the following lines to match the post type(s) you are working with:
  $post_types = array(
    'projects',
    'customers'
  );
If just using regular posts for example, you can use:
  $post_types = array(
    'post'
  );
Finally, here is the code… keeping in mind the changes for post types, described above…
<?php
/* START: Require Post Title (i.e. Job Name) for Projects */
function cc_require_post_title( $post )  {
  $post_types = array(
    'projects',
    'customers'
  );
  if ( ! in_array( $post->post_type, $post_types ) ) {
    return;
  }
?>
<script type='text/javascript'>
  ( function ( $ ) {
    $( document ).ready( function () {
      $( 'body' ).on( 'submit.edit-post', '#post', function () {
        if ( $( "#title" ).val().replace( / /g, '' ).length === 0 ) {
          if ( !$( "#title-required-msj" ).length ) {
            $( "#titlewrap" )
            .append( '<div id="title-required-msj"><em>Field is required.</em></div>' )
            .css({
              "padding": "5px",
              "margin": "5px 0",
              "background": "#ffebe8",
              "border": "1px solid #c00"
            });
          }
          $( '#major-publishing-actions .spinner' ).hide();
          $( '#major-publishing-actions' ).find( ':button, :submit, a.submitdelete, #post-preview' ).removeClass( 'disabled' );
          $( "#title" ).focus();
          return false;
        }
      });
    });
  }( jQuery ) );
</script>
<?php
}
add_action( 'edit_form_advanced', 'cc_require_post_title' );
/* END: Require Post Title (i.e. Job Name) for Projects */
?>
Optional STEP 5: Another optional step is to replace the placeholder text for this field. Remember, by default, WordPress uses the Placeholder: Enter Title Here
The example below shows how to Blank it out, but you can change the text to whatever you like. Also, you can make certain that it is only for specific post types. As you can see in the example, I am blanking out the Placeholder text for both the ‘customers’ and ‘projects’ post types.
<?php
/* START: Blanks the 'Enter title here' text when adding Customers/Projects */
function cc_change_title_text_for_cpts($title) {
  $screen = get_current_screen();
  if ('customers' == $screen->post_type || 'projects' == $screen->post_type) {
    $title = '';
  }
  return $title;
}
add_filter( 'enter_title_here', 'cc_change_title_text_for_cpts' );
/* END: Blanks the 'Enter title here' text when adding Customers/Projects */
?>
I hope this was helpful for you. I know that it isn’t precisely what you were asking. I will subscribe to this thread and get email alerts if you need further help. But, if it works for you, please let me know!
-
Hi @alekspvn
I’m not sure I am 100% clear on what is being asked, but I am going to do my best to help. I may need more clarification.
The Image field can return an Array, a URL, or an ID for each image, so it largely depends on which choice you made as the Return Value how you write the code.
Since Array is the default return value, I will show code for that below:
I am guessing you need help with the code between the ‘div’ with the ‘panel’ and ‘multiple-items’ classes, so here goes…
<?php
if ( have_rows('photo_slider') ) {
  while ( have_rows('photo_slider') ) {
    the_row();
    $slide_photo = get_sub_field('add_photo');
    if ( !empty($slide_photo) ) {
?>
<img src="<?php echo $slide_photo['url']; ?>" alt="<?php echo $slide_photo['alt']; ?>" />
<?php
    }
  }
}
?>
Is that what you are looking to achieve? I will get an email alert with your reply, and will help further if need be!
-
Keith Lock
- in reply to: Using acf/fields/post_object/query with subfields/repeater
- September 3, 2017 at 10:51 am
Hi Ben,
I was unable to duplicate the issue you are having. I was able to successfully use your filter verbatim when my field was and wasn’t a subfield in a repeater.
However, the filter: acf/fields/post_object/query is meant for the Post Object type, not the Page Link type. So… it shouldn’t have worked at all for you, subfield or not, if using a Page Link field, right?
Are you able to switch to a Post Object instead without having to change too much else around?
Welcome
Welcome to the Advanced Custom Fields community forum.
Browse through ideas, snippets of code, questions and answers between fellow ACF users
Forums
Helping Others
Helping others is a great way to earn karma, gain badges and help ACF development!
